|
Search this site for keywords or topics..... | ||

Custom Search
| ||
Cold Frames
What Are They, and Why Are They Used?
Cold frames have been around for at least several hundred years, and probably longer than that. The basic idea is to enclose areas of growing bed, garden row or other fertile soil with some kind of protective shell which simultaneously lets in light and heat, and keeps out cold and rain. Traditional European designs, which are reflected in the designs still described in gardening and farming books, consisted of a wood and glass shell. The glass portion of the frame typically aims wherever the sun is strongest during the day. More modern frame renditions can be made of nearly anything - wood, cinder blocks, straw bales, various manmade materials such as fiberglass, plastic, big rubber tires, etc. The lids still need to be either clear or translucent to allow sufficient daylight, but even there the list of materials has expanded from glass to include plastic film, rigid plastic or fiberglass sheets, and even old recycled windows and sliding glass door panels.
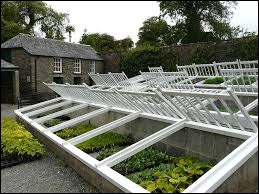
In terms of size, cold frames can be tiny affairs, 10sqft in area or less. Or they can be long enough and wide enough to cover entire planting beds. Historical information from European all-season commercial growing operations illustrated some farms and larger gardens with hundreds or even thousands of square feet under glass. A very close relative of the cold frame is the French cloche, which involved protecting a single plant with a bell-jar made of glass. Typically though, cold frames were large enough for dozens if not hundreds of seedlings or seedling trays. They would be set up as early in the growing season as possible. Heavy blankets were even used to provide extra protection during extremely cold events, but they had to be rolled back again every morning to let in the sun.
Regardless of how large or small, the concept is the same - the shell blocks harsh winds and create a protected atmosphere, while the glass tops let in the sun during the day and hold heat in at night. The glass also protects the plants from rain, hail, snow and whatever else the elements can throw around. The shell construction can be carefully joined, long-lasting woods, stained or painted inside and out to reflect as much light within and weather the four seasons, paired with a closely fitted glass lid. Or they can be as simple as a few spare boards with an old window sash over the top, or some straw bales piled up to form four walls, and a window sash laid over the top. Or anything in between. Some are even built such that they can be assembled and dis-assembled quickly, to allow efficient storage in between uses. A grower’s needs, layout, and materials at hand will determine how the shells are constructed.
There are a few rules for how cold frames are designed and made. First, the larger the cold frame, and hence the greater the volume of air trapped within, the slower that air will lose heat overnight. In other words, smaller structures will chill down faster than large ones, if all other variables are the same. Secondly, cold frames can heat up surprisingly fast when the sun comes out and shines down on that area under glass. If growers aren’t careful, the interior can become an oven on nice days. To avoid that, most frames are built such that the glass tops can be opened at least a little, but sometimes quite a bit, to keep the inside temperatures in a favorable range. Third, the shell exteriors are subject to quite a lot of weathering, given their mission in life. If they are built of stout wood, thick glass and well-considered assembly, they will provide many years of efficient service. On the other hand, some cold frames are built with materials on hand, where affordability is more important than durability. Again, that’s the grower’s preference. There’s no one best design.
A final rule for cold frames is often overlooked, but probably as important as any listed above. Namely, it needs to be comfortable to work in, around and over. You need to be able to prep the soil inside without being a contortionist. You need to be able to lift and lower the lid(s), repeatedly throughout the early growing season, without the lid(s) falling backwards and breaking, or collapsing down during the heat of the day. And the shell needs to either be stout enough to stay out in the elements all winter, or portable/collapsible enough to set up and take down repeatedly. Some growers have a dedicated portion of their growing area set up as permanent cold beds, and can afford the space to set up their cold frames as permanent structures. Others need to design their cold frames carefully to be portable, or collapsible, without being flimsy.
Advantages and Disadvantages
The first main advantage for cold frames is that while the above rules apply for design, construction and usage, there are literally no limits on how to accomplish those goals. It’s strictly “built to suit”, ie, suit your needs, your area, your budget, your body shape, strength and preferences, even your aesthetics. If you want one for this tiny area over here because it’s the one spot in the garden that gets good strong early spring sunshine, so be it. If you want to protect your entire garden under a whole group of growbed covers, so be it. The cold frame police won’t come calling because you did it differently. Maybe your neighbor will come calling, first to poke fun at your work because that’s what neighbors do. But if you’ve designed it well, with your needs solidly in mind, that neighbor will come calling later to get new tomatoes from you before his or hers are ready.
The contained climate within a cold frame is definitely another main advantage. Young plants can often take colder temps than we want, as long as those temps don’t last long and particularly as long as those temps don’t involve a lot of air movement. It seems to be the physical action of the wind and rain striking the leaves which slows growth and wears down the plant’s resistance. So merely keeping that air volume from making fast changes, and preventing wind/hail and rain from physically abusing the leaves, will do wonders for young plants. The buildup of heat during the day can also be considerable. Cold frames will heat up considerably even on cloudy days. That definitely helps the plants get a good strong start early in the year, as long as that heat doesn’t go too high. And finally, cold frames keep the soil a little drier and warmer during the spring, which boosts germination speeds and reduces fungal issues.
Finally, cold frames can provide excellent protection against all manner of insect, bird and small animal damage, if a few extra precautions are taken. Slugs would absolutely love to hide in the spaces underneath the frame boards, and the corners where frame sides come together. Using a variety of slug repellents around the base and along the sides will go a long way towards preventing their occupation of your cold frames. Painting the inside of the frame a nice bright color will also help. Most birds won’t recognize that a cold frame has tasty young plants inside at first, but they may become a problem later in the season when the lids are wide open most days. In those instances, some netting over the frame can keep birds from decimating the tender plants within. Four-legged visitors who wander in from outside the garden will be kept out of the cold frames much the same way birds are, but you might need protection later in the year as with birds. Those creatures that tunnel in from below may prove to be a problem, since cold frames will give them better accommodations too. If they are a major problem, that can be dealt with by lining the bottom of the cold frame with hardware cloth, and putting your young plants in terra cotta pots which are then placed through openings in the hardware cloth. A lot of work, but it would be effective.
The main disadvantages with cold frames are two-fold. First, the issue of the frames overheating is pretty serious, because a single sunny afternoon with closed lids can cook all your efforts. Unless you can guarantee that you’ll be on hand to raise those lids manually when needed (and that’s a hard promise to keep), you may want to either get in the habit of lifting the lids at least a little to provide for some ventilation, or install temperature-sensitive push-rod arms which can open and close the lids as the temperatures go up or down during the day. The second major disadvantage is that most cold frames are built from glass and wood, two materials which are either prone to breakage and/or water damage. Some folks will recycle materials so that breakage and weathering aren’t as big an issue, given that the item already served its main purpose in life and is being used again before falling apart completely. But other growers will go the extra mile and use stout materials, and/or build the cold frames such that they can be assembled, disassembled, and maintained in the off season.
A third disadvantage is the sheer weight involved for the traditional wood-and-glass designs. Glass is heavy. Wood is heavy. If you have a single cold frame, that’s probably not a big deal. But if you have twenty of them to maintain and move around and lift and close, over and over, it gets to be an issue. Manmade materials, however, can lighten that load considerably. That’s where a careful consideration of materials cost vs expected life span vs employee convenience will give you the best compromise.
How To Use
Cold frames are typically used in one of two ways. One option is to have the frame simply be a box that is covered with something which will permit light to pass through, but not moisture. That box could be set up on dirt or pavement or decking or whatever. Then trays of seedlings are placed inside. The soil in the seedling trays provides the starting nutrients for the young plants, rather than the contents of the box itself. This option gives tremendous flexibility to setting up a cold frame in areas which otherwise wouldn’t be suitable for growing. If the seedlings were repotted into larger containers periodically through the year, that cold frame could become their season-long home.
The second major method, and possibly the more typical, is to set up the frame right over the fertile ground where the plants are to be grown for at least awhile. Some growers have dedicated germination beds, where seeds are put down in carefully prepared soil. The frame provides the protection needed for those seeds to get their good start. Later the young plants can be pricked out of that planting bed and transplanted elsewhere, thus freeing up the cold frame to start another generation of plants. In another variation on this theme, some growers set up cold frames directly where the plants will grow out their entire lives, ie, their final planting bed. This arrangement is less work overall because there’s no transplanting involved, but it is somewhat wasteful of space because the plants are seeded at their final spacings, and thus more spread out while in the seedling phase than they would be in seedling trays. This arrangement is typically reserved for very fast-growing, early season, high dollar crops such as mesclun where the crop is planted thickly, comes up quickly, must be kept immaculate and offers a premium price by getting to market early. With those criteria, any way to save time and boost quality is more than adequate to offset the initial waste of space.
One important consideration with planting into soil within the cold frame, is how best to deal with soil fertility, weeding, mulching, crop rotation, etc. Robust cold frames are wonderful in terms of protection against the elements, but they can also hamper ground preparations and cultivation. A less permanent cold frame can be put up and taken down more quickly, but is less stable in strong winds. A grower should carefully consider whether to do soil preparations and/or cultivation before/after the frame is set up, versus within the frame itself.
Our Experiences
We have used a variety of designs and materials over the years, typically in the form of permanent, stationary protection around fertile soil. We started with cinder blocks which didn’t work well for us because we didn’t level the ground ahead of time. Just during the first three months of the season, the cinder blocks settled unevenly and gaps formed between the individual blocks, thus letting in not only cold drafts but also insects and slugs. Our supposedly protective environment became something of a slug trap, and the veggies were the bait.
The next year, I built frames out of plywood reinforced with 2x2 dimensional lumber along the edges. Because plywood will fall apart when exposed to even small amounts of moisture, I applied several coats of white paint inside and out, to provide not only protection to the wood but also a nice reflective surface. That material worked well, but I didn’t size the frame itself very well. I didn’t vary the height from front to back so the window on top was relatively level to the ground. That meant rainwater would collect in each window light instead of running off to one side. That allowed algae to grow on the glass, thus dramatically reducing the light transmission. The way I’d built the sides, it would have been awkward to add height at the back and slope the side walls to match the slope of the lid. I ended up giving up on that particular frame.
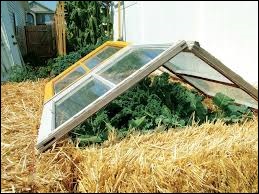
Another thing we’ve tried is to use straw bales as a frame, covered with a sliding glass door. The bales provided a wonderful interior space, but it was difficult to provide adequate insulation along the sides where the lid sloped from back to front. Also, the bales dictated certain dimensions which couldn’t easily be changed without breaking apart a bale and retying it. I could work with length and width, but the back wall had to be a whole bale taller than the front wall, which again wasn’t ideal. Plus the straw bales deteriorated pretty quickly during the growing season, and they were soggy and heavy to remove at the end of the season.
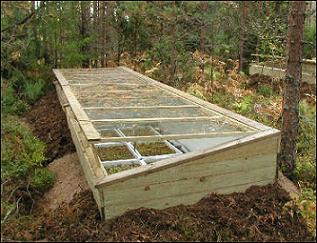
The best design we’ve come up with so far is the traditional wooden slat or board walls with a sloping glass lid. This simple, elegant design avoided all the above problems. It took more effort to make, but proved to be the longest-lived design of the whole batch. My one objection to this design was the use of 2x3’s as the reinforcement in the corners. Those corners, particularly at the bottom, seem to collect water in the seams, while also being under a lot of stress from any side-to-side movement of the frame. So the base of each corner rotted away really quickly, thus making the whole frame unstable. I also had concerns that the glass lids would break, thus showering glass into crops that sometimes were supposedly ready to “rinse and eat”. We never broke a pane but I fretted a lot that we would.
We took a couple of years off to consider these lessons and figure out how best to proceed with our next design. I haven’t really finished deciding how I want to do things. I’m intrigued with MDF which can be virtually waterproof, and thus wouldn’t be nearly as prone to water damage. Yet it can be worked and shaped like wood. I’m also toying with the idea of fiberglass or plastic lids so that I don’t have to worry about glass breakage. Finally, I have very limited growing space in adequately sunlit areas early in the year, so my garden germination area can only be so big. Given that, I’m inclined to try the idea of a dedicated set of frames located outside the garden area, probably along the south side of the house for maximum heat retention, protection from elements and solar gain. I need to make the most of the garden's limited growing space and frames located elsewhere would allow me to do so. Suffice to say that our designs are still being finalized. But I sure look forward to the day when we get those details figured out and really fine-tune this growing system. February won’t be quite so bleak with well-thought-out frames chock-full of young plants, growing thick and healthy.
Additional Resources
This general approach has been a traditional gardening and farming tool, for many generations of growers. As a result, it seems there are literally thousands of construction plans available. There are also dozens, if not hundreds, of books which offer a tremendous amount of detail about how best to build, use and re-use these frames. Nevertheless, we offer the following as a sampling of the vast information available about this wonderful method. Enjoy!
The Cold Frame Handbook is a 9 page pdf download, available from the Hobart and William Smith Colleges website. This bulletin seems to have started as a senior thesis and was so helpful it was turned into a PDF download for public access. The bulletin includes onstruction details, usage recommendations, variations on the design, and other best-practices suggestions.
This guide from Montana State University's Extension service covers both cold and hot frames, and how to use either design (or a hybrid) to achieve various season extender goals. Like the others it is available as a free PDF download.
Building A Cold Frame ils a 9-page bulletin, in free PDF download format, from Hidden Springs Farms in conjunction with www.smallfarmcentral.com. Like the others, it provides construction details and usage recommendations. However, this particular guide assumes the grower will want to use recycled materials, such as old windows. So the instructions provide guidelines for how to take old windows of various sizes, and build the cold frame around those dimensions.
Ongoing Research
As with so many other gardening topics, we've hardly scratched the surface here for what's possible with this valuable, flexible, multi-faceted technique. We've shared the best of the best that we know of, and we continue our own work with these frames. Yet others are doing their own work. If readers are aware of other resources, please Contact Us with the details and we'll add those sources to the above information.
Where to Buy
Many home improvement stores and hardware stores offer either cold frame kits and/or fully assembled cold frames, in late winter and early spring. They are less common but still available year round at dedicated gardening centers and of course through farming and gardening catalogs. Internet retailers also offer them year-round. But many growers choose to build their own, either because they want dimensions/features which aren’t available in the preformed products, or they want to cut costs by using materials they can readily access such as old window sashes, dimensional wood, straw bales, recycled masonry, etc. If a grower is unsure whether to buy or build, these questions will help determine their options:
1) how big will the frame be? Are preferred sizes available for purchase or would a grower have to dramatically change plans to accomodate what's available?
2) how will it be used? Will it simply be a box located on a non-plantable base, or will it be a true frame surrounding fertile soil?
3) Will it be permanent, or temporary? Stationary, or moved from place to place? And will it be used all year, or stored in the off-season?
Once these questions have been answered, a grower can review the materials at hand, the materials or kits available for purchase, and start to make some careful choices.
Our Successful Farming and Ranching Books

We released our very first self-published book. The Chicken Coop Manual in 2014. It is a full color guide to conventional and alternative poultry housing options, including 8 conventional stud construction plans, 12 alternative housing methods, and almost 20 different design features. This book is available on Amazon.com and as a PDF download. Please visit The Chicken Coop Manual page for more information.

Rabbit Colonies: Lessons Learned
We started with rabbits in 2002, and we've been experimenting with colony management ever since. Fast forward to 2017, when I decided to write another book, this time about colony management. The book is chock-full of practical information, and is available from both Amazon and as a PDF download. Please visit the Rabbit Colonies page for more information.
The Pastured Pig Handbook
We are currently working on our next self-published book: The Pastured Pig Handbook. This particular book addresses a profitable, popular and successful hog management approach which sadly is not yet well documented. Our handbook, will cover all the various issues involved with pastured hog management, including case studies of numerous current pastured pig operations. If you have any questions about this book, please Contact Us.