|
Search this site for keywords or topics..... | ||

Custom Search
| ||
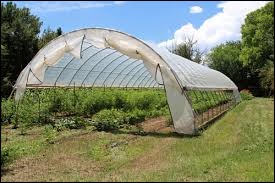
High Tunnels
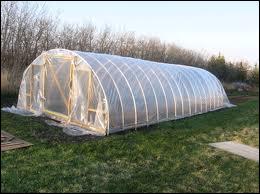
High tunnels are, as the name implies, simply larger versions of their low tunnel cousins. I have written extensively about low tunnels on the Low Tunnels page. The vast majority of those design features, advantages, disadvantages, uses and experiences are the same regardless of whether the tunnel is low or high. So on this page, I’m going to focus just on those features unique to high tunnels. For a complete treatment, please refer back to the Low Tunnels page.
What Are They, and Why Are They Used?
The only structural differences between low and high tunnels are height, overall size, and access to the crops within. The arrangement of crops within can vary dramatically based on access, but high tunnels typically feature at least a central walkway down the middle, with planted rows, beds or benches along either side.
Both low and high tunnels are used for the same reasons, which are all discussed on the Low Tunnels page.
Advantages and Disadvantages
High tunnels have most of the same advantages and disadvantages as low tunnels, but here are some exceptions:
First, the high tunnel holds a larger volume of air per square foot of floorspace than low tunnels, and as such will be a better buffer against hard drops in temperature either at night or during cold spells. The rate of temperature change will also be slower, because the same square footage, and only slightly more surface area, encloses a much larger volume. Plants generally do better with temperature changes that occur slowly rather than quickly.
Secondly, these tunnels are tall enough to walk into. That means most of the soil prep, planting, cultivation and harvesting work can be done under cover. In bad weather that can be a very nice advantage.
Third, the additional height means that growers can use growing benches, trellises and/or baskets inside, thus dramatically increasing the available growing space within the same footprint.
Fourth, high tunnels are cheaper per cubic foot than low tunnels, since the volume is dramatically increased with only a moderate increase in construction materials.
And finally, the larger size gives growers incentive to use it more throughout the year. Growers who might not otherwise have experimented with four-season production have a good reason to explore that option once the structure is put together, where low tunnels tend to be more temporary and thus remain three-season shelters. A related benefit is that the larger structure generally requires stronger materials and assembly. While this will cost more up front, it will last longer over time. Additionally, a high tunnel can be mounted on skids and pulled to new locations either during the year or between years. This functionally gives growers the benefits of having two tunnels for the cost of assembling only one.
High tunnels also have a few disadvantages.
To start with, ventilation can sometimes become a problem during the summer heat because of that increased volume. Some growers simply leave each end open to provide natural ventilation. That method works for tunnels which aren’t very long (one grower told me no greater than 40’ long). But even that can be insufficient on the warmest, sunniest days. Fans, vents, or rollup sides can become a necessity to get rid of the heat buildup, and each of those costs additional time, money and effort. Similarly, active growth within the tunnel can consume all the available CO2, thus leaving the plants gasping. Fresh air must constantly be introduced to combat both these problems. As I noted on the Low Tunnels page, one very nice way around these problems is to build the tunnel on a slight incline. As heat builds up in the tunnel, natural convection will move the interior air to the highest point in the tunnel. If that end of the tunnel is open, that air will naturally exit the tunnel, pulling in cooler, CO2-rich air from the other end. Within a very short time, the tunnel itself will create a convection system which pulls cool air in from one end, and exhausts warmer air out the other. One grower using 10' x 100' long high tunnels for tomatoes and squash deliberately put his tunnels on a very slight hillside for this exact reason. He told me a person could stand at the far end of the tunnels on a warm day and feel that hot air blasting past in a continuous stream. He certainly doesn't worry about heat buildup or CO2 deprivation. Nothing like using natural systems to accomplish our goals. For free.
Secondly, the taller profile can make high tunnels more prone to windstorm damage. They will require greater anchoring to the soil in areas prone to such damage.
Third, their size may trigger permit requirements in some locations even though they may serve as a temporary agricultural structure. Check with your building department to see if your area requires any permits for a tunnel. This is especially true if a) the tunnel is greater than about 400sqft, which seems to be a common permit threshold, and/or b) it's a permanent or near-permanent installation. Even if it is just sitting on the ground, some regulatory agencies will view "stationary" as being equivalent to "permanent".
Fourth, assembly of a high tunnel becomes a bit involved given the increased size and weight of the various components. It can be done solo, but most of the growers I know will use teams of people to assemble new houses. The structural components can safely be erected solo, if the grower has sufficient braces and ladders and so on. However, raising a sheet of film over such a large structure can very quickly become a serious challenge. For one thing, it can be very difficult to pull so much film over a large structure, with only one individual pulling. Secondly, the slightest breeze can pick up that film (and anyone hanging onto it) and carry it off to neighboring counties. See my note below about how to cover a high tunnel while working solo. It can be done but it requires some planning and staging in advance.
Another disadvantage isn’t really a limitation of the concept itself, but rather a potential problem easily overlooked. The lightweight materials commonly used for tunnels are excellent for three-seasons use. But when these structures are left up all year long and allowances have not been made for snow loads, growers can get a nasty shock some white winter morning when they see that their pretty tunnel laying crushed in the snow. Snow is amazingly heavy, even when “dry”, and growers should absolutely allow for that weight if there’s any chance the tunnel will remain standing through winter. I have had tunnels start to sag and lean dangerously offcenter with only 2" of heavy wet snow. The more off-center they go, the more likely they'll come down. See my notes below about how to prepare for snow, or clear snow off the roof.
Some Helpful High Tunnel Hints (learned the hard way)....
How to Raise Film On A High Tunnel, Working Solo:
The general recommendation while building high tunnels, is not to build them by ourselves. Yet sometimes a grower needs to get a high tunnel put up, and all the helping hands are otherwise engaged. It can be done, but it has to be done carefully to avoid problems. One method I've used here when covering a new tunnel, is to first arrange the film along one long end of the structure, in position to be raised up and over the ridgeline. I try to fold the film accordion-style, such that it will pull up easily and evenly. Then I attach long lengths of rope or even lengths of baling twine (which we have a LOT of), about every 5' along the leading edge of the film. Assume you'll need 1.5 times the width of the structure, to get over the top and down to the other side. In other words, a 20' tunnel would need 30' of rope at each tug point. That ensures you have enough rope to go all the way up and over the entire structure, to ground level on the other side. Third, I weight each rope with something heavy enough to carry some momentum. It can be anything small and dense - I've used my utility knife (folded up first), my shoe, a flashlight, etc. But my favorite is a stack of 1" washers, zip-tied together, such that I can pass the rope or twine right through the middle of that thick "donut". I then toss each length of rope over the structure to the far side. The weight ensures that the rope has enough momentum to sail over the structure to the far side.
Once the ropes are all on the far side, then I go over to that far side, and start to systematically tug on each rope in turn, raising the film a few feet each tug. I fasten or secure that rope to either a ground weight or ground anchor after each new tug, then move onto the next one. That tying-off ensures that section of the film won't slide back down to the ground while I'm working on the next one. In this manner, I can single-handedly pull the film over the structure in about 15 minutes, without any help at all.
Ideally, do this on a day which is preferably calm and clear. But it can be done in much less ideal circumstances. I've used this method in the middle of the night, in the middle of a storm, by flashlight, when a big tree branch came crashing down through our barn roof. I had to remove the branch and debris, and cover the roof with a big tarp to keep the rain from pouring in. Suffice to say I was moving as quickly as I could, rather than doing the job in a relaxed, comfortable manner. That was a long night but I got it done. It's a lot easier to do when it's light, and calm, and nice weather outside.
How To Protect High Tunnels Against Snow Load:
One very common scenario is that growers will originally plan to take the tunnel down in fall. But time slips away, they don’t get the tunnel dis-assembled, or all the field gear magically migrates into that structure when no one is looking. And the tunnel goes into winter unprepared for snow loads. Or perhaps snow loads in your area are typically X amount, but some major storm is coming in which is supposed to dump four times that amount on your tunnel. Here are a few ways you can avoid a cold wet disappointing surprise that next morning.
If you have a little bit of lead time (even 30 minutes, or if the snow has just started to fall), one very good option is to place vertical supports under the peak of each arch. That by itself has saved a lot of houses from collapsing. They don't need to be elaborate - 2x4's or even 2x2's cut to approximate length have saved our tunnels more than once. If equipment or growing benches or that stupid broken-down tractor is inconveniently in the way of where a post should go, get creative. We've hurriedly attached a horizontal 2x4 beneath several hoops (using nothing fancier than baling twine), then put vertical supports under the horizontal 2x4 wherever it was convenient to do so. The horizontal 2x4 carries the hoops that pass over it, and transfers that load to the vertical supports, even if the spacing of those supports isn't ideal. You don't need to have that arrangement forever - just long enough for the storm to pass and the snow to melt.
If, however, your high tunnel is already sagging, it might be too late for that strategy. Time to take more drastic action.
How To Clear Snow Off A High Tunnel Roof:
Even 2" of snow on a high tunnel roof, can be enough to cave it in. Thankfully there are a variety of ways to get that accumulated snow off, even as the snow keeps falling. One popular option is to have two people drag a rope along the ridgeline. This breaks the snow’s grip on the plastic, allowing it to fall down the sides. If you're working solo, one option is to rig up a “snow rake” with any standard fixed-tooth rake. Either tie or run a short lanyard through or around the handle such that you can toss the rake a short distance without actually letting go of it entirely. Then flip the rake over so the teeth are pointing away from the plastic, and toss it as high up along the sides of the tunnel as you can reach. It will either bounce off and bring down at least some snow, or it'll sink into the snow on the roof, and hang there. That's where the lanyard is so handy. Pull gently on the handle, and use the flat back of the rake to bring snow off the roof. Be sure to stand out of the way of the snow coming down! No, it's not pretty and it's not fun, but it works. I have repeatedly done this for our weaker tunnels and outbuildings, and we’ve never had one collapse yet. But I fantasize about the day I have tunnels either strong enough to survive the winter without help, or disassembled and put away on time.
Whether you use these methods, or come up with your own, be prepared if there’s any chance of snowfall during the winter. Cleanup and rebuilding a collapsed tunnel takes 10 times the effort as making reinforcements prior to snow. If it collapses, you'll use up your entire wintertime allotment of curse words in only a few hours.
Our Experiences
I have built a lot of my own low tunnels as detailed on the Low Tunnels page, but I have only built and used a few high tunnels here on this farm. They were temporary structures and served their purpose decently well, but we took them down after a few years (and a few snowstorms). I am working on a new design for a next-generation high tunnel which I hope to start building in time for the 2014 growing season. I’ll detail our experiences in that structure after we’ve been using it awhile.
In the meantime, I do have quite a bit of experience working in other growers’ high tunnels and their close relative, the standard commercial greenhouse. The lines between high tunnels and simple greenhouses is getting blurrier all the time. One of the differences I've used over the years, is that high tunnels tend to not have light, power or water service, yet greenhouses typically have all three. Despite this difference, high tunnels and greenhouses are used in much the same ways. In each case, regardless of details, I found the high tunnels wonderful to work in except on the hottest of summer days. The benefits gained by having that protected growing space seemed to easily outweigh the acquisition costs and the assembly hassles. But that’s me looking at the finished product, rather than fighting with all the preliminary planning, permitting, purchasing and construction work. The vast majority of growers I know, whether serious hobbyist or commercial scale, have at least one high tunnel. None of them want to take them down or sell them later except in cases where they are selling the property itself. Furthermore, almost all the growers I know have several high tunnels, yet have only one or two greenhouses (or none whatsoever). The high tunnels are so much easier and cheaper to build, that they are more popular even without lights, power and water. That right there is a good testament to how valuable those high tunnels really can be.
Additional Resources
High tunnels are so valuable that many universities and grower suppliers provide instructions, plans, and/or kits for building and using them. Here is a sampling of the information available on these tunnels:
This outstanding 77 page High Tunnels guide, available as a free PDF download from the University of Vermont, provides an excellent guide to high tunnel design, construction and usage.
This guide to High Tunnel Tomatoes from the University of Kentucky describes how this crop can be grown successfully, and profitably, in high tunnels.
Pennsylvania State University Extension has published a very nice 31 page guide to Growing Greens In High Tunnels. This guide is a Powerpoint presentation of various high tunnel techniques to grow a variety of typical market greens, such as mizuna, lettuce, mesclun, etc. A little short on text, but the plentiful photos provide a lot of information.
Where To Buy
High tunnels are common enough now that folks have a choice between buying a kit, or building them from scratch. The kits are readily available from a variety of retail outlets and online sources. The benefit of using these kits is that the pieces are already measured out and presumably fit together the way they should. Growers will pay more for a kit but they won't have to cut things to size or figure out how it all goes together. One advantage to buying a kit is that most kit manufacturers will provide technical support and warranty service if something goes wrong during installation or usage. If growers don't have a lot of experience with high tunnels, that support can be valuable. Once a grower has more experience with high tunnels, they may or may not feel the need for that kind of backup.
Yet many growers choose to make their own. The cost savings are considerable, but the grower will make up for that in time spent measuring and figuring out how the pieces go together. Put a few of them together, and that part gets pretty easy. Creating a high tunnel which is conveniently sized to use off-the-shelf components without cuts - for instance, 10' or 20' poles, and plastic film already of the right size - can go a long ways towards keeping the cost low. In that instance, shop around at the home improvement stores and hardware stores to see what's locally available, or see what's available online, then design the high tunnel accordingly to make the most of those materials. One middle-of-the-road approach is to follow plans provided by a variety of sources. Those folks have already worked out a lot of the details, and there's no sense reinventing the wheel. Please see the Additional Resources section lower down for several different sets of high tunnel plans.
Our Successful Farming and Ranching Books

We released our very first self-published book. The Chicken Coop Manual in 2014. It is a full color guide to conventional and alternative poultry housing options, including 8 conventional stud construction plans, 12 alternative housing methods, and almost 20 different design features. This book is available on Amazon.com and as a PDF download. Please visit The Chicken Coop Manual page for more information.

Rabbit Colonies: Lessons Learned
We started with rabbits in 2002, and we've been experimenting with colony management ever since. Fast forward to 2017, when I decided to write another book, this time about colony management. The book is chock-full of practical information, and is available from both Amazon and as a PDF download. Please visit the Rabbit Colonies page for more information.
The Pastured Pig Handbook
We are currently working on our next self-published book: The Pastured Pig Handbook. This particular book addresses a profitable, popular and successful hog management approach which sadly is not yet well documented. Our handbook, will cover all the various issues involved with pastured hog management, including case studies of numerous current pastured pig operations. If you have any questions about this book, please Contact Us.