|
Search this site for keywords or topics..... | ||

Custom Search
| ||
Low Tunnels
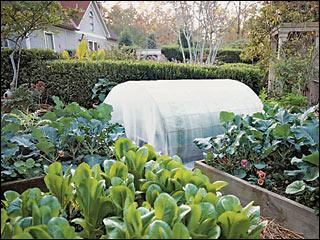
On this page I’ll discuss low tunnels, also known as low hoop houses, ie, those which are low enough that you can’t walk into or stand up inside them. They are instead accessed from the sides. These structures are separate and distinct from high tunnels, which are tall enough to walk in. I’m using that particular distinction for two reasons:
1) access to these two sizes of structure is very different. Low tunnels are accessed from the sides, while high tunnnels are accessed from each end, and typically from a walkway down the middle.
2) all crop planning and management options are dictated by this access. Soil prep, planting, cultivating, harvesting, watering, even ventilation, are dictated by whether access is from the sides or from each end. Low tunnels and high tunnels may look similar to each other, but they are used very differently.
So, to get a good grasp of both possibilities, I humbly suggest you read both this page and the High Tunnels page, and compare/contrast the two. Whatever season extension method you’re looking for, one or the other (or both) may provide a good fit.
What Are They, and Why Are They Used?
A tunnel, whether low or high, is generally a structure featuring a series of hoops formed of various materials (metal and PVC being the two most common), covered by a thin plastic film, either white, clear or translucent. The hoop shape usually means the overall building is a half-cylinder, often a great deal longer than it is wide. Also thanks to the hoop shape, most tunnels are exactly twice as wide as they are tall, which has implications for working spaces both within and without the hoop. Some tunnels are firmly anchored to the ground via any number of methods, while others are deliberately built on skids which allows them to be dragged or carried from one location to another without being torn down and rebuilt. The interior dimensions of a tunnel can vary dramatically based on the grower’s size preferences, growing needs, budget and preferred and/or affordable construction materials/methods.
Both types of tunnels are commonly unheated, although either may use some form of root zone heat such as heating cables, heating mats and/or buried manures which give off heat while composting. Both kinds of tunnels are used to provide cover throughout the growing season, and in some cases throughout the year, for all kinds of crops. In early spring and late fall, the plastic film allows the passage of sunlight (and therefore heat) through the walls and into the interior, thus warming the interior sometimes 30F or more when compared to outside temps. At night, that air mass is slower to cool down than outside, thus preserving at least some of that heat for the plants inside. Generally speaking, the larger the air volume inside, the longer it takes the house to cool down overnight. But tunnels of both kinds may also be used throughout the growing season as protection from things like insect and bird pests, hail, driving rain and strong winds, dust, even pollen or pesticide drift from neighboring areas. Both types of tunnels can be constructed such that they are easy and fast to put up and take down, or as robust and permanent as their big brothers the greenhouses.
Those are the features which both low and high tunnels share. The difference then between a low and high tunnel comes first from the height. As stated above, low tunnels are too low to stand in, so are generally 6’ high or less. High tunnels are tall enough to walk into and through, at least down the middle (tallest) portion of the house, so are generally 6’ tall or greater. This difference, in turn, dictates the very important design feature of how to access the plants inside. If the house is tall enough to walk into, that almost always means plants are set up in rows or beds along each side, with a walkway down the middle. Either the beds or rows will be narrow enough that growers can reach those plants closest to the wall, or regular smaller walk areas (or even stepping stones) will branch off from the middle walkway to provide edge access. Some high tunnels will have fixed film that is not easy to raise, and ventilation is provided at each end. Others will have film which can be raised on at least one side (sometimes both) for ventilation purposes, in addition to windows or vents on each end. Low tunnels, on the other hand, don’t permit upright entry from the ends. In some cases, the ends are sealed off entirely. So plants must be accessible from the sides. Those crops will thus be oriented in such a way that the middle of the bed can be reached from one side or the other (or both), and both sides must be easily accessible with the plastic film easily raised and lowered. This page will discuss only the low tunnels. Please see our High tunnels page for a discussion of that style season extender.
Advantages and Disadvantages
Low tunnels are possibly the easiest, lowest cost, biggest-bang-for-the-buck season extenders available today. Wow, that’s a big claim. But here’s why:
First, they are very easy to work with. A person working solo can put up or take down a 5' x 50' low tunnel in less than two hours, once that person has worked out a routine to do so efficiently.
Secondly, the costs for the materials themselves is minimal. As of this writing, PVC hoops of sufficient length are generally less than $5 apiece and readily available in most hardware stores or home improvement centers. PVC rods typically come in either 10’ or 20’ lengths, and a ½” diameter rod is flexible enough to bend easily, yet stiff enough to hold its shape once placed. Spacing between hoops can vary according to circumstances, but spacing between 4’ and 6’ on center is fairly standard. Metal hoops are more durable, but more expensive. Even then, the simple structural needs provide very reasonably priced protection.
Third, the protection provided by that structure is considerable. The film will protect plants against hard rains, hail, heavy winds and even light to moderate snow loads. Any one of those can cause considerable damage to unprotected crops, any time of year.
Fourth, the combination of hoops and film creates a large volume of air around the plants. That volume of air is easily heated by even modest solar exposure, and it loses that heat slowly overnight. A hoop only a few feet high at its peak can raise temperatures 30F during the day, and 10-20 overnight. Many plants benefit from a day/night change of temperatures but most plants appreciate a slow progression from cold to warm and back again. Raw weather can change those temps back and forth very quickly, but the tunnel slows and moderates those swings.
Fifth, the tunnel can protect not only the plants but also the soil, from cold heavy rains which are commonly present in both early spring and late fall. Those cold heavy rains can dramatically affect soil temperatures and slow down germination and/or growth. Dry soils are warm soils. By shielding soils from those cold rains with a tunnel, your soil temps will be preserved. The house’s concentration and preservation of heat will also help passively boost, and preserve, soil temps.
Sixth, a low tunnel is sometimes easier to work with than a high tunnel. By accessing plants from the outside, growers don’t have to worry about hitting the underside of the tunnel film or the hoops themselves. If leaning in from outside, growers can actually use the hoops themselves as a handhold.
Seventh, there’s no worry about losing interior growing area to walkways. Walkways take up considerable internal space, which could otherwise be used for growing.
And finally, large carts, rototillers, and other pieces of equipment won’t be pinched for space, run off the walkway and into beds, or otherwise create hassles when they are moved alongside the tunnels rather than within.
Of course, nothing in life is free, and low tunnels do have some drawbacks:
First is that while the plants are protected, the grower is not. Maybe I’m just a wimp, but one of my least favorite tasks is doing field work in the rain. Even with protective gear such that I’m warm and dry, I find myself rushed and irritable when it’s pouring outside and I’m fighting with all the rain running off the sides of the house, rolling down on whatever I’m trying to do.
A closely related second disadvantage is that raising and lowering the film during that access needs to be carefully considered. Some growers take the time to build rollup mechanisms in their tunnels, by which the film can be uniformly raised and lowered by turning a crank at one end. In principle it’s an elegant design, but in practice it can be a pain to put together. The longer the tunnel, the more effort is required. A second way to raise the film is much more direct - loosen the film anchors, and either flip the film over the peak, or scrunch it up accordion-style and affix it in that raised position while working. I have used both of these methods, and in clear weather either of them work well. In rainy or blustery conditions, that film can flap around quite a bit and utterly refuse to cooperate. Thus increasing my annoyance at working in the rain. I have been working on ways to secure the film in that upright position, in ways mechanically simpler and faster than the crank method, but so far none of those methods have quite come together yet. One method I've read about, but haven't used, is to stretch cord from one side of the tunnel to the other, in between each hoop. That cord can be anchored into the soil on either side and create a very snug fit. By alternating hoop with cord, one after the other, the film is alternately held up and held down. Enough friction is created with this arrangement that the film can simply be shoved up between the alternating hoops and cords, and stay there by friction alone until the grower actively pulls the film down again. A photo of this technique can be seen on the Season Extenders Summary page.
An even simpler idea I read about was to use simple string, rope or baling twine, to tie up both sides at once, with something of a belt that constricts the film between two hoops. A single rope or line of sufficient length, with some kind of quick-release snaplink, could make quick work of raising the film just long enough to do some work, then allowing quick and clean release to move on. A whole set of these could also be used fairly easily to provide good ventilation when the weather turns warm. All told, this idea seems to have merit, particularly given that we have lots and lots of used baling twine. I’ll be trying that method here to see how well it works.
A third disadvantage is actually the flip side for one of the advantages listed above, namely, soils that become too dry. When tunnels are used early in the year and/or for long periods of time, the migration of water through the soil can slow down or stop. Provisions should be made to monitor the soils in the tunnel, and introduce irrigation if/when needed.
How To Use
Tunnels of any size can be used in a variety of ways, throughout the year. So this ‘how to use’ section will vary depending on the grower’s needs. However, there are a few standard uses and associated how-to list of guidelines:
First on many growers’ minds in springtime is the question of how soon the soil will dry out and warm up. Tunnels can dramatically help in this regard. Setting up a tunnel over planting beds several weeks prior to cultivation and planting, can give soils a break from spring precipitation. That break can warm temperatures quite a bit. If tunnels are put up soon enough in the year (January in these parts), that artificial “dry spell” will dry out the soils well in advance of planting dates. That long lead time gives growers another opportunity - cultivation and fertility treatments in relatively dry soils, with time to spare prior to planting. That double shot can make the difference between crops which get in late, in poorly prepped soils, versus well tuned warm soils and quickly germinating seeds.
Later in springtime, when those seeds have been planted or those transplants have been put in the ground, there’s always the risk of a late frost, a harsh rain/hail/windstorm, or other extreme weather. If the tunnel wasn’t already in place to dry out soils, and/or if planting efforts required the use of equipment that prevented the use of tunnels, the tunnel could certainly be set up as soon after planting as possible, thus protecting those precious little plants from the vagaries of weather.
A third specific use is later in the prime growing season, when the plants are active and the pests are too. Tunnels provide protection not only against weather but also against pests. If you have a particular pest harassing a particular crop, a tunnel may provide good protection against it if set up in advance of that pest’s arrival.
A fourth specific use is to provide extra heat through the growing season for those crops which need more than the local growing season can offer. Some cooler or more exposed areas (such as ours) struggle with warm-season crops. We just don’t have enough heat, enough days, to bring those crops to maturity. Tomatoes, squash, melons, cucumbers, peppers, basil - all of them thrive in long, hot conditions which some regions just can’t reliably provide. Tunnels can bring those crops to reliable maturity even when the weather doesn’t cooperate. In those circumstances, careful attention must be given to providing adequate ventilation to the plants under the tunnels during the heat of the day. Not only can heat buildup harm plants, but the fast metabolism will use up whatever CO2 is in the confined spaces, and CO2 starvation will slow plant growth just as easily as dehydration or nutrient deficiency. One of the best ways I’ve ever seen to combat both heat and CO2 deprivation is to build the tunnel on a slight incline, then leave the ends open. That slight change in elevation will become a convection engine that will draw amazing amounts of fresh air inside, warm it as it goes through the tunnel, then expel it out the far (higher) end.
One particularly compelling use for tunnels is for small-scale protection of GMO-free corn. Corn is one of the most commonly grown crops in household gardens, and corn pollen is extremely prone to wind drift. Corn pollen can travel hundreds of miles on the slightest breeze. Combine those two, and there are few (if any) areas in the country which can safely say they are out of range of GMO corn pollen contamination. If you’ve gone to the effort of trying to buy GMO-free corn seed, you’ll want to protect your plantings from what is likely to be GMO-contaminated pollen coming in with every new breeze. A tunnel can help you do that. However, you will need to provide for air movement under the tunnel so that the corn within can self-pollinate. A fan or two within the house can recirculate the air sufficiently well that the corn will be well pollinated even when isolated from outside breezes. Or pollinate by hand to be extra sure. Either method will take some effort on the grower’s part, but they can provide nice peace of mind for household-scale or small market scale corn plantings.
And finally, tunnels can help draw out the growing season even after the peak growing period has come and gone. For those crops which need longer than average growing seasons, say 120 days or more, using tunnels at both the beginning and end of the year can provide that longer season. Many frosts in early fall are light and short-lived. Even the smallest, simplest tunnel can provide weeks of additional growing time for this reason alone. Putting up the tunnel a few days in advance of the first likely frost, or even the day before, can provide enough protection to keep all your vulnerable plantings safe. A related benefit is for those plants which need a buildup of ethylene gas to mature their fruits, such as tomatoes. Putting a tunnel over those crops, even without an imminent frost, can speed along the maturation of those late fruits, perhaps bringing green fruit along sufficiently quickly to meet end-of-season production goals for farmers markets or CSA’s.
Our Experiences
We use low tunnels extensively, for a variety of purposes. We’ve used tunnels for virtually all the purposes listed in the How To Use section at one time or another. Our springs are usually slow, cold and damp. So our most common tunnel uses are to dry out the soils in the early year and get young plants off to a strong protected start. There are precious few things as wonderful as planting into warm, perfectly moist soils in March, knowing that we have another two solid months of rain on the way. Our second primary use for tunnels is due to our relatively cool growing season, even after the rains dry up. Some summers we never get over 90F, and we have relativley few days in the 80’s. Farms on the valley floor below us can reliably grow a variety of warm-season crops without much protection. But up on our hillside, our tomatoes, squash and peppers would really struggle without some kind of additional heat during any but the warmest year. And most years we would not be able to grow melons or peppers at all. Tunnels give us the extra heat, for those extra days, such that we can grow those crops with some reliability.
We’re continuing to experiment with different materials each year, but so far our favorites are the 10’ PVC rods and super-cheap film, set up over our 4’ or 5’ wide growing beds of various lengths. So far we’re still growing on a small enough scale that we can cover any particular growing bed with low tunnels, which gives us a lot of flexibility. As we continue to expand we are occasionally tempted to plant larger blocks of space, but that would preclude the use of these low houses over those larger, wider areas. For that reason alone, we will keep to our wide planting bed setup for all but the hardiest crops.
Additional Resources
A variety of universities have released guides to low tunnel design, construction, and functionality. Heree are just a few:
Cornell University did some research on combining both high and low tunnels, to combine the advantages of both. Their report details how that combination affected temperature swings through the day.
Texas A&M has published a guide for using low tunnels for strawberry production. Their report covered not only the actual tunnel design and construction details but also issues such as irrigation, soil prep and pest control.
WSU has created this guide to low tunnel construction, offering detailed directions for a variety of sizes, with recommendations for specific hoop and covering materials.
Where To Buy
Tunnels, low or high, are constructed from extremely basic materials. The plastic film can be sourced through any one of dozens, if not hundreds of either local or online retailers. A wide variety of films are out in the marketplace, ranging from extremely thin 1-2mm one-season film, up to 6mm heavy duty, IR-treated greenhouse film. Of course, the thicker and/or more feature-laden films will be more expensive, but they’ll also last longer. Growers can use their own judgement about how best to balance those needs.
The hoops themselves are most commonly made from either PVC rods or curved metal poles (commonly referred to as EMT), both of which are widely available at most hardware stores and home improvement centers. EMT poles come in 10’ lengths and a variety of diameters. Even the smallest diameter will work nicely for growing-season tunnels. But another good source of metal poles are chain link support posts, and those tend to run cheaper than EMT poles in some areas. There are a variety of metal pole benders available to help bend the poles into the desired shape, but you’ll still want some way to join them. This is why PVC rods generally are more commonly used, because of inexpensive 90deg or 45deg elbows. Or, using PVC poles eliminates the need for joints of any kind - simply bow the pole over from one side to the other. A 10’ PVC pole will create a 3-6’ wide tunnel, depending on how tall or flat the arch is made. Those dimensions are plenty to accommodate one wide or two narrow growing beds, or several rows. A 20’ PVC pole will create a tunnel 10-15’ wide, again depending on how tall or flat the arch is made. Those are discussed in more detail on the High tunnels page.
Dimension wood can certainly be used to create either style of tunnel. I don't see wood used as often as the other materials, possibly because it takes a bit more handling to shape and join than either PVC or metal poles. Also, wood is prone to rot from the high humidity which can build up inside the house. But it is definitely a possibility.
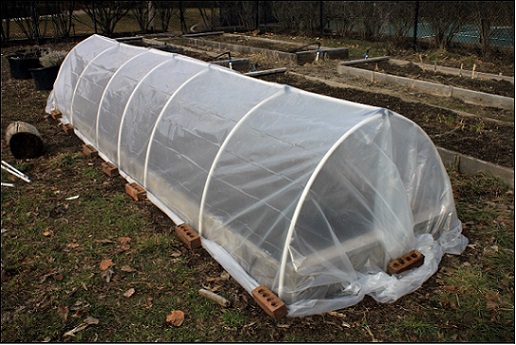
One additional possibility is to use either concrete reinforcement mesh, or a type of fencing alternately called hog panels or cattle panels. These three materials are strikingly similar - heavy gauge wire welded together in a mesh pattern with 4"-6" openings. The concrete reinforcement mesh is often exactly 7' long by 4' wide, but I've also seen it in rolls, 4' wide by 100' long. The hog panels and cattle panels are typically also made in the same fashion, also 4' wide, but 20' long. The concrete reinforcement mesh makes a nice wide arch that carries plastic well. You can see an example in the photo above. Several hog panels and cattle panels, being longer, would create a taller arch suitable for a high tunnel. Put a few of those panels in series and you'd have a nice tunnel just tall enough to walk into. That extra height would need a central support of some kind to keep from sagging, but that could be rigged up a few different ways with dimensional lumber.
Our Successful Farming and Ranching Books

We released our very first self-published book. The Chicken Coop Manual in 2014. It is a full color guide to conventional and alternative poultry housing options, including 8 conventional stud construction plans, 12 alternative housing methods, and almost 20 different design features. This book is available on Amazon.com and as a PDF download. Please visit The Chicken Coop Manual page for more information.

Rabbit Colonies: Lessons Learned
We started with rabbits in 2002, and we've been experimenting with colony management ever since. Fast forward to 2017, when I decided to write another book, this time about colony management. The book is chock-full of practical information, and is available from both Amazon and as a PDF download. Please visit the Rabbit Colonies page for more information.
The Pastured Pig Handbook
We are currently working on our next self-published book: The Pastured Pig Handbook. This particular book addresses a profitable, popular and successful hog management approach which sadly is not yet well documented. Our handbook, will cover all the various issues involved with pastured hog management, including case studies of numerous current pastured pig operations. If you have any questions about this book, please Contact Us.