Germination Cabinets
Germination cabinets are not very common, but they should be. Simply put, a germination cabinet is any chamber which creates the ideal conditions for germination and initial growth. Where we’ve already discussed various heat sources which can stimulate germination, heat isn’t the only thing needed for a plant’s first few weeks of life. Some growers are either working with extremely fussy crops, or the grower’s local microclimate isn’t well suited to growing those crops. Or both. Under those circumstances, providing heat is necessary but not sufficient. Providing ideal humidity, light and sometimes even intelligent use of space, can make the difference between valuable crops limping along, or surging ahead.
What is a germination cabinet, and when is it used?
I have seen a few different germination
cabinets, all homemade per the grower’s individual wants and needs.
Those variables may seem confusing, but not when you boil down the
functions served by that cabinet:
First, the cabinet must at least provide heat before germination can occur. That heat can be provided via soil heating cables,
heating pads, radiators or a heated reservoir of water. The former
might sound like a much simpler option than the latter, but the latter
actually also provides the second need: humidity.
Humidity is another requirement for most seeds. Most growers would
think of that as keeping the soil or growing medium adequately moist,
and leave it at that. But relative humidity can make that task easier
or more difficult. When the relative humidity around a seedling is too
low, moisture can be sucked out of that growing medium surprisingly
fast. On the other hand, if humidity is too high, damping off disease
can lay waste to whatever you might plant regardless of how much
drainage you offer those seedlings. Creating a controlled environment
to keep those humidity levels near ideal levels might take more effort
up front, but it results in better performance over time.
Light is not a requirement for most germination, but it is definitely a
requirement once the seedlings break the surface. When heat is
provided, that germination can occur extremely quickly, sometimes faster
than we can keep up with. By setting up and providing adequate
lighting not only for germination but also for the first few weeks,
those plants can get a solid start while the grower is free to work on
other tasks, or free up other growing areas.
Many different growing methods can provide those first three
requirements. But one thing unique to germination cabinets is the
fourth design principle - intelligent use of space. Hot and cold
frames, hoophouses and greenhouses, almost all use only one level of
growing area, namely the soil at ground level, or seedling trays set on
the ground. Some hoophouses and greenhouses are set up with benches or
baskets in addition to the existing soil, thus increasing the growing
area by perhaps another 50%. Germination cabinets, on the other hand,
usually offer multiple shelves for growing space, which dramatically
increases the growing area within a very small footprint.
One additional, optional feature which some folks use very effectively
is a CO2 supply, for two reasons. First, the cabinet is wonderful at
containing heat and light and humidity, but that lack of air exchange
with the outside world does come at a cost - the young plants will use
up CO2 very quickly And CO2 has been called "the missing link" in a
variety of controlled-atmosphere growing situations, such as those found
in closed hoophouses or greenhouses. Since plants use CO2 the way we
use oxygen, any drop in the concentrations of CO2 will have considerable
impact on plant metabolism. Simply ensuring that CO2 levels stay at
normal atmospheric concentrations of roughly 300ppm will ensure this
"nutrient" doesn't become a deficiency. But possibly most importantly,
CO2 concentrations have not always been at 300ppm in our atmosphere.
Earlier geological eras featured CO2 at much greater concentrations - as
high as 1500ppm. Interestingly, most deciduous plants can still do
very well, even thrive, in those much higher CO2 concentrations. Much
like people can do very well in rich oxygen environments. Normally, CO2
supplementation isn't cost effective when working with a large volume
of air like hoophouses or greenhouses. But in the close quarters of a
germination cabinet, CO2 supplementation is much easier, and will have
much greater impact. It's not necessary if passive venting is otherwise
provided to the cabinet. But it's an opportunity to further boost
growth if the grower so chooses.
Advantages and Disadvantages
As we’ve started to hint above,
germination cabinets offer some unique benefits. First is the issue of
space. Growers are often in a pinch at the start of the growing season,
because they don’t have enough space for all the needed seedling trays.
Growers must choose what to plant first, then wait for space to open
up before planting another round of trays. Worse, that staggered
planting schedule can sometimes result in delayed products for the table
or the market. Yet germination cabinets offer a way for growers to
plant a tremendous number of trays early in the season, and ensure that
all of them get the environment they need.
Secondly, the ability to provide light and humidity, in addition to the
heat, can be a substantial advantage over other forms of season
extension. Hot and cold frames, hoophouses and soil heating methods are
most commonly used early enough in the season that ambient light and
humidity levels are far from optimum. Providing 14 hours of light a
day, and moderate amounts of humidity, can boost growth, cut losses to
damping off and other seedling diseases, and get seedlings ready for
transplant much faster than via extra heat alone.
Third, the germination chamber allows us to capture and hold every last
bit of heat we’ve worked so hard to create. As we discussed on the soil heating cables page,
the grower runs the risk of losing a great amount of heat into the soil
if the planting area aren’t insulated. Even if the planting area is
insulated, the ground still radiates that heat back into the atmosphere.
The germination chamber, on the other hand, is much less prone to
leaking heat if it is even moderately insulated. That’s because air is a
natural insulator, and the cabinet is typically surrounded by air on
all sides. Furthermore, the materials for the cabinet walls are often
insulative in their own right, and further reduce heat loss. Whatever
heating system is used within the germination cabinet, that heat source
is almost certain to cost less to maintain than using the same heat
source in an exposed or even partially insulated alternative. If using
electricity for heating mats or heating cables, the savings can be
considerable.
And fourth, germination cabinets offer most (if not all) of the same
advantages as hoophouses or even full-service greenhouses during the
first few weeks of seedling life, at a dramatically reduced cost.
Because the cabinet makes such efficient use of space, the materials
savings alone can be more considerable as compared to a hoophouse or
greenhouse. For instance, one farm I worked at had an 8x10 fiberglass
greenhouse, complete with heat, light, ventilation and water service.
That small house provided the seedlings with their start in life. There
were two main benches in the house, along with two smaller shelves
above the main benches. The footprint of that seedling house was
80sqft. The shelves and benches provided an actual growing area of only
50 square feet. The purchase price for that house was approximately
$4000. Very close to the same growing area could be obtained by a
germination cabinet that was 4’ wide by 2.5” deep, with six shelves in
it. Each shelf would be 48” wide by 24” deep, thus allowing for 10
square feet in size. The shelves would not quite fill the full cabinet
depth; the extra cabinet depth would allow for the passage of wires for
the heating and lighting, while also helping to circulate the air.
Anyone with decent carpentry skills could assemble this cabinet and
fully stock it with heat mats and small fluorescent lights for less than
$1000. Possibly a lot less if they shopped first for good deals on the
assembly materials. The operational costs would be dramatically less
because less heat would be needed to maintain the desired temperature,
and those plants would emerge into plenty of light. More benefits than
other season extenders at a fraction of the cost.
Germination cabinets, like everything else, do have a few disadvantages.
First, they generally aren’t available for purchase, which means a
grower needs to construct their own. I have seen something similar in
home improvement centers, consisting of a tall set of freestanding
shelves covered by a close-fitting, clear vinyl jacket. These could be
considered a good start for a germination cabinet, but it’s not quite
the same. These generally have fixed shelves, which may or may not
correspond to the number of shelves needed. Second, the shelves are
often not very wide, and again may not meet the grower’s needs. I often
also wonder how durable those shelves are, after being loaded down with
fully loaded seedling trays. They may or may not stand up to hard,
repetitive use. Those cabinets also don’t have any internal provision
for heat cables, heat mats or lighting; the only heat and light comes
passively through the vinyl much like it would through a hoophouse film.
Most of the cabinets used by the commercial growers I know of are
homemade, to the grower’s specs, sized to provide exactly the amount of
space that grower needs. They are also wired to provide for lights
underneath each shelf, and each shelf typically has heat mats and/or a
heater at the base. They are often on wheels so that the grower can
move them from place to place as needed. And the cabinets I’ve seen are
built for years of reliable service. But that robust cabinet needs to
be designed and constructed by the grower, in addition to everything
else going on, and that can be a stumbling block for busy growers
already trying to tackle too many projects at any given time. Once this
initial obstacle of time, money and effort is overcome, all the
advantages listed above kick in.
Another disadvantage isn’t really a disadvantage as much as an
obligation. When a new tool is set loose on the farm, sometimes that’s
becomes a mixed blessing. It allows growers to do a single task which
then obligates then to do a whole chain of followup tasks in order to
make the most of the entire sequence. What is that in plain English?
If we have the ability to germinate and sprout peppers on New Year’s
Day, such that they’re 2” tall six weeks later, that ability doesn’t do
us any good unless we can then plant them somewhere safe and sound on
Valentine’s Day. Which then becomes a new “task” for growers on top of
everything else to be done in late winter. Building the germination
cabinet is relatively easy. Building the rest of the support
infrastructure to make those plants happy for the rest of the at-risk
early growing season is a much bigger responsibility. If growers are
willing to take on that entire process, and can do so cost effectively,
then the germination cabinet is a worthwhile addition. If the rest of
those pieces cannot reasonably be provided, it’s not.
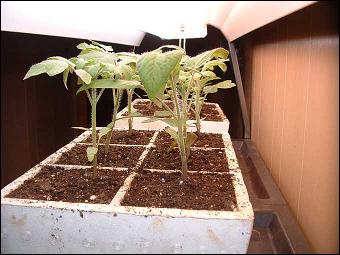
How To Use
Germination cabinets are primarily used,
as implied above, to get high-value and/or tender seedlings going as
early in the year as possible. Typically, the most likely candidates
for starting in germination cabinets are those that take the longest to
get going, those which need a longer growing season than is typically
available in that location, and/or those which are fragile and unusually
prone to the risks of early-season stressors. Some growers I’ve talked
to with germination cabinets use their cabinets for peppers, corn,
eggplant, squash, tomatoes, melons, basil and other tender herbs.
The biggest task when using the germination cabinet is to figure out the
ideal light, heat and humidity your seedlings need in advance, and make
sure the germination cabinet is set up to provide it. Happily, most
seedlings need these three in fairly similar ranges - soil zone temps
between 50-65F (with some seeds needing slightly higher temps), relative
humidity in the range of 40-60%, and good strong light for 14hours per
day. These three criteria can be provided via soil heating mats set at
the correct temperature, a tray of water at the base of the germination
cabinet which is warm enough to put water vapor into the cabinet air,
and either fluorescent tubes or LED lights under each shelf to provide
light to the shelf below. Two additional features which help a great
deal are small fans to keep the air moving around in the cabinet, and a
CO2 tank to pipe CO2 into the cabinet once the seedlings are
respirating.
Once these features are set up and running, a grower would be well
advised to let the unit run for a few days, then set dummy seedling
trays inside and monitor the cabinet for a few more days to ensure those
parameters are stable. Once the cabinet is up and running and holding
those parameters within target ranges, the actual crop seeds are planted
in seedling trays much like they would be otherwise. The trays are
then placed in the germination cabinet just as they would be placed on
the heating pads in a hoophouse. Growout time will vary according to
each plant, but be prepared for slightly faster growout and have their
next homes ready before necessary. Germination cabinets can hold
seedlings for a short time, particularly if CO2 is piped in, but even
those ideal conditions will eventually create a plant that’s too tall
for its location in the cabinet.
Our Experiences
We haven’t built our own full-sized
germination chamber yet, but we have worked with smaller-scale enclosed
containers, suitable for 1-4 seedling trays at a time. I was pleased
enough with those results to look forward to build a full-sized cabinet
as described above. I’ve talked to those who have cabinets very similar
to those described above, and I’m fairly envious. The advantages are
considerable. The main reason we haven’t moved forward on this project
is precisely because of the “rest of the process” disadvantage I
mentioned earlier. We can very easily build the cabinet/ but we’re not
yet set up with the rest of the infrastructure we’d need to move those
strong young early plants into suitable housing after they left the
cabinet. As much as I love the idea, I need to have the rest of those
pieces in place first.
Where to Buy
The vast majority of growers who use
germination cabinets are using homemade units. While researching this
article I did find that some companies offer premade germination
cabinets, which surprised me. They offer all the features of the
homemade units - lights, heat, and humidity. I did not happen to notice
any that offered CO2 supplementation, but I didn’t look too closely. I
was instead put off by the stainless steel, heavy industrial appearance
of the units. In a word, they seemed overbuilt. Perhaps they would be
appropriate for use by university researchers who need those more
exacting standards and heavy-duty chassis for classroom and lab use. Or
growers who are breeding their own varieties and need sterile
conditions between each batch, along with year-round ruggedness.
Perhaps if I won Lotto and had already purchased all the other items on
my wish list, I’d get one just to experiment with it. But not
otherwise.
At the other end of the spectrum are used cabinets of all makes and
forms, which have been “re-purposed” for their new task as germination
cabinets. These are a lot more common. Kitchen cabinets, metal utility
cabinets, molded plastic yard storage cabinets, freestanding shelves,
even toy bins and old refrigerators or freezers have been resurrected
for use as germination cabinets. I’m always amazed and impressed by
farmers’ and gardeners’ thriftiness. If you like the idea of the
germination cabinet and already have one of these cabinets not serving
any particular purpose, you can probably retrofit it to serve admirably
for a fraction of the cost of buying new or even building with new
materials.
For those of us not quite fortunate enough to have a spare cabinet of
just the right size, and who don’t want to spend money on the high
dollar units, it’s relatively straightforward to construct a workable
cabinet out of plywood, reinforcing dimension lumber such as 2x2’s, and
sufficient hardware for doors, vents, and castor wheels if the unit is
to be portable. While it works best to have insulation around all six
surfaces, that may or may not be worth the hassle. And a see-through
door can be very convenient even though light is available above each
shelf; that see-through feature can be a nice reminder to check the
contents every day. A non see-through door would be too easy to walk
past without notice.


Our Successful Farming and Ranching Books

We released our very first self-published book. The Chicken Coop Manual in 2014. It is a full color guide to conventional and alternative poultry housing options, including 8 conventional stud construction plans, 12 alternative housing methods, and almost 20 different design features. This book is available on Amazon.com and as a PDF download. Please visit The Chicken Coop Manual page for more information.

Rabbit Colonies: Lessons Learned
We started with rabbits in 2002, and we've been experimenting with colony management ever since. Fast forward to 2017, when I decided to write another book, this time about colony management. The book is chock-full of practical information, and is available from both Amazon and as a PDF download. Please visit the Rabbit Colonies page for more information.
The Pastured Pig Handbook
We are currently working on our next self-published book: The Pastured Pig Handbook. This particular book addresses a profitable, popular and successful hog management approach which sadly is not yet well documented. Our handbook, will cover all the various issues involved with pastured hog management, including case studies of numerous current pastured pig operations. If you have any questions about this book, please Contact Us.
Weblog Archives
We published a farm blog between January 2011 and April 2012. We reluctantly ceased writing them due to time constraints, and we hope to begin writing them again someday. In the meantime, we offer a Weblog Archive so that readers can access past blog articles at any time.
If and when we return to writing blogs, we'll post that news here. Until then, happy reading!