A Whirlwind Tour Through Season Extenders
March 12, 2011
My farming partner and I have been working the last few weeks in her several greenhouses, planting and transplanting the first crops of the year. Amongst those crops are peppers, tomatoes, eggplant, lettuces and cool-season salad greens. We've also gotten some herb cuttings going including rosemary, thyme, sage, tarragon and mints. Our work has primarily been done inside because the weather outside has been dreadful, particularly this year. We’ve had rain almost every day for the last two weeks. Not the warm, gentle rains of a warm spring, but the cold, bone-chilling, blustery rains of a winter that won’t let go. We may be listed in the USDA’s Zone 8, but the Pacific makes sure we don’t warm up very fast in springtime. In fact our spring doesn’t generally yield to summer until around the second week of July.
Given that climate, most producers here use a variety of season extenders not only to provide protection to tender young plants, but also provide protection to grouchy farmhands (such as myself) who absolutely hate working in the rain. Ok, I’m a wimp, but I’ll work inside on nasty days if at all possible. The nice thing about greenhouses and hoophouses is they give us the ability to get work done on the farm, regardless of the weather. And I can safely say that if I dislike working in the cold rains of early spring, you can bet our seedlings don’t like it either. Yet if we waited for the weather to warm up and stabilize, we would have missed half our growing season. So there’s a genuine economic benefit to having those season extenders.
But what type of season protection do we need? Ahhh, that’s really the million dollar question that most producers have asked, and asked again, over the years. The answers keeps changing. Not because the plants want different conditions, but because the options keep increasing. Starting from simplest/cheapest to most expensive, here’s a rundown of the most common season extenders in use on our two farms and in our area:
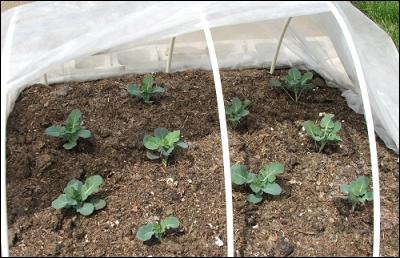
Floating Row Covers
Floating Row Covers are the cheapest, simplest form of season extension. They consist of a thin woven film of manmade material, which is permeable to air, water and sunlight. One very common form of floating row cover is a product called Reemay. Row covers are intended to provide minimal protection to tender plantings from the worst of wind, rain and chill, but they are not intended to protect plantings from actual storm conditions. One nice feature of such covers is their light weight - they are so light that even emerging seedlings and delicate leafy greens won’t be crushed underneath it. We use Reemay when we harden off our lettuces for the first few days, particularly this time of year. Even nice days this time of year tend to be breezy with scattered cloud cover, resulting in warm sunbreaks but chilly cloudbreaks. An interesting side benefit of Reemay is that it can hide even mature crops from various pest insects which would otherwise fly over and land on the plants. It isn’t 100% protection, but it has provided considerable protection for plants which otherwise would likely have been decimated by such pests. A caution is warranted, however, because Reemay can also trap insects which are emerging from the soil, such that they are required to feast on the plants under cover. So, know your pest and how it attacks plants before you rely on this for protection. And if you use it for mild weather protection, either be ready to bring in those plants if wind and rain move in, or weight down the cover with bricks, rocks or soil. Otherwise it will blow away and decorate the nearest trees.
Heat Mats and Germination Chambers
Heating mats are commonly used with a variety of indoor propagation methods, but not so commonly used outside. Just as the name implies, they are rubber or plastic mats which heat up to provide root-zone heat. Some of the more expensive ones can be plugged into each other and/or into a thermostat which allows the grower to literally dial in the desired temperature. Some of them need protection from water, and others are waterproof. All of them can provide a real jump on germination times by putting the heat right where it’s needed - in the soil. I have worked in unheated greenhouses where the air temps were near freezing but the seedlings were perfectly happy, because their root zones were a steady 60F or 70F or even 80F. If you’re working with tender young plants, nothing smooths out the rough edges to early spring quite like warm roots. Germination chambers take that even further, by providing not only root zone heat but also dramatically boosted air temps in a small area around seedlings, just long enough to get them started. One of our region’s growers has really mastered this method. He created rolling germination chambers made from tall commercial bakery-style racks, covered with a shell of tacked-on or taped-on greenhouse film. The rack holds multiple shelves of seedlings. Each shelf held something like three or four standard seedling trays, and there was only a few inches’ clearance between the top of one tray and the bottom of the next. But that’s all he needed. In the bottom of the rack assembly, he has a reservoir of heated water that provides gentle moist heat to the whole thing, and dramatically reduced the need to water the trays. He had figured out the planting dates and germination times for a wide variety of crops, including some crops that are not normally started in this fashion, such as sweet corn. He has about a half dozen of these racks in an unheated greenhouse, along one wall, constantly rotating new trays in and seedling trays out. That small area is the work horse for his early-season planting activities, and a profoundly efficient use of space, heat, electricity and irrigation.
Cold Frames and Hot Frames
Cold Frames and Hot Frames are older, tried-and-true ways to improve germination and early-season or late-season production, but without the need for a larger hoophouse or greenhouse. These frames are generally built over planting beds, and are several feet tall, several feet wide, and as long as needed (sometimes covering the entire planting row or planting bed). Older farming books will talk about frames made of wood and glass. Newer books and a tour along modern farms will see greenhouse film and PVC hoops used instead. Either way, this approach is only intended to provide mild to moderate protection to the actual plant in the ground, rather than seedlings in trays. The frames are not tall enough for people to walk in. Cold frames have no heat source other than sunlight, but even that can provide sufficient heat that the covers will need to be lifted or removed on sunny days. Frames also allow the soil to warm up faster than usual, not only because of the heated space but because cold rains are kept off the soils. Moisture contributes greatly to soil temp - the drier the soil, the warmer it is. So between the drier conditions and the storage of solar heat, the temps experienced by the plant can be considerably warmer than they would be otherwise. Hot frames have the same general construction, with one major difference - soil heat is provided. That soil heat was traditionally provided by burying fresh horse manure in an excavated hole or trench to a depth of 8-10”, then covered with regular soil, then covered by the frame. The manure’s decomposition would heat the soil above it, giving steady gentle heat for up to about 8 weeks. Once that source of heat had been used up, the seedlings were generally far enough along that they no longer needed that additional heat. The nice bonus for that approach was that the now-rotted manure provided a nice nutrient source for the growing roots, thereby providing not one but two services to the growing plants. The manure portion of this approach has been replaced over the years with heating cables, heating pipe, and then finally with the heat mats described above. But somehow I suspect the plants all enjoyed that compost.
Walk-In Hoophouses
Walk-in hoophouses were probably an expansion of the cold frame concept. A 24” tall cold frame would protect the plants, while a 72” hoophouse made of the same materials would protect both the plants and the farm workers. Given that most hoophouses use bows or arches of wood, metal or PVC, going taller also generally meant going wider. So those taller hoophouses could therefore cover two or three rows or beds instead of just one. That meant a greater working area with better working conditions. It also meant a larger contained air volume which dramatically slowed down the temperature swings overnight. Hoophouses can definitely still drop below freezing in sharply cold, or extended cool weather. They can also definitely overheat in sunny weather. In fact, they can only functionally be about 50’ long without having the ability to raise the sides. That’s because a hoophouse longer than 50’ will rarely have enough air movement to adequately ventilate the middle of the house, even if both ends are open. Raising the sides can alleviate that problem and allow the houses to be as long as desired.
Greenhouses
Greenhouses differ from hoophouses in terms of size, permanent versus temporary construction methods, and usually the inclusion of electricity, plumbing and some form of automatic ventilation. Because of those additional features, greenhouses often have permanent flooring, dedicated beds, and/or other infrastructure to maximize the efficiency of whatever is grown inside. I can’t give too many more details about greenhouses, because the details vary so much according to whatever is grown inside. But they generally require an order of magnitude more money to build, along with permits and inspections during construction because they are permanent structures. Still, the additional infrastructure can make a nice difference if the farm is ready to pay for that additional efficiency.
So if you are despairing of the weather, Dear Reader, and wish there was a way to get going with your planting a little earlier, or keep working in the dirt a little later, one or more of these methods can definitely serve you well. Consider your goals, your circumstances, your climate and your pocketbook, so that whatever you choose fits you, and your operation, comfortably.


Our Successful Farming and Ranching Books

We released our very first self-published book. The Chicken Coop Manual in 2014. It is a full color guide to conventional and alternative poultry housing options, including 8 conventional stud construction plans, 12 alternative housing methods, and almost 20 different design features. This book is available on Amazon.com and as a PDF download. Please visit The Chicken Coop Manual page for more information.

Rabbit Colonies: Lessons Learned
We started with rabbits in 2002, and we've been experimenting with colony management ever since. Fast forward to 2017, when I decided to write another book, this time about colony management. The book is chock-full of practical information, and is available from both Amazon and as a PDF download. Please visit the Rabbit Colonies page for more information.
The Pastured Pig Handbook
We are currently working on our next self-published book: The Pastured Pig Handbook. This particular book addresses a profitable, popular and successful hog management approach which sadly is not yet well documented. Our handbook, will cover all the various issues involved with pastured hog management, including case studies of numerous current pastured pig operations. If you have any questions about this book, please Contact Us.

Weblog Archives
We published a farm blog between January 2011 and April 2012. We reluctantly ceased writing them due to time constraints, and we hope to begin writing them again someday. In the meantime, we offer a Weblog Archive so that readers can access past blog articles at any time.
If and when we return to writing blogs, we'll post that news here. Until then, happy reading!